IPv6 (Internet Protocol Version 6) is a next-generation IP protocol designed by the IETF (Internet Engineering Task Force) to replace the current version of the IP protocol (IPv4). Currently, the version number of the IP protocol is 4 (abbreviated as IPv4), and the next version is IPv6. With the rapid shortage of IPv4 resources, it is believed that in the near future, IPv6 will become the standard for the most generation of Internet addresses. Compared to IPv4, IPv6 has a rich address resource consisting of six digits separated by periods. The following is a detailed description of how to set the IPv6 address.

Tools/raw materials
Computer (with IPv6 protocol)
Method / step
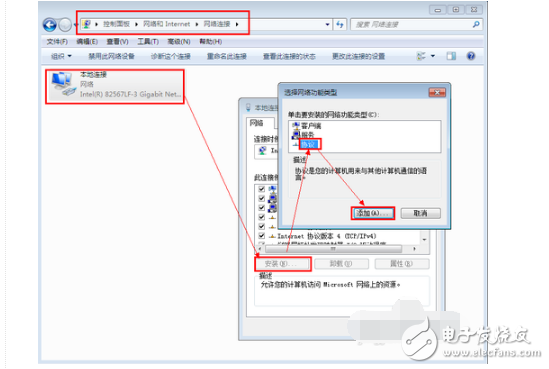
Install the IPv6 protocol: Open the Control Panel, go to "Network and Internet" - "Network Connection" - right click on "Local Area Connection", click Install in the pop-up Properties dialog box, then select "Protocol", click Add, you will be IPv6 is installed into the project list. After the installation is completed, as shown below:
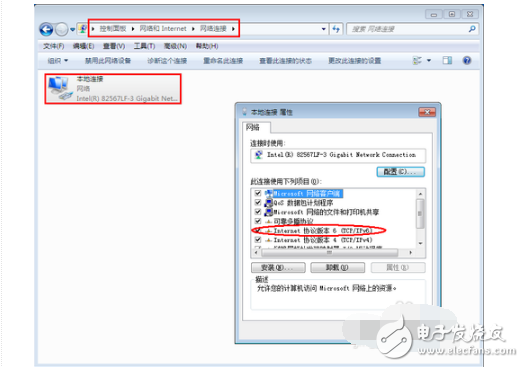
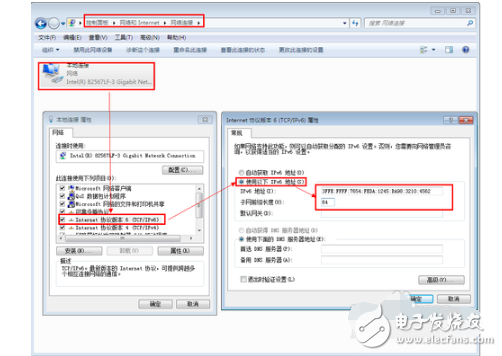
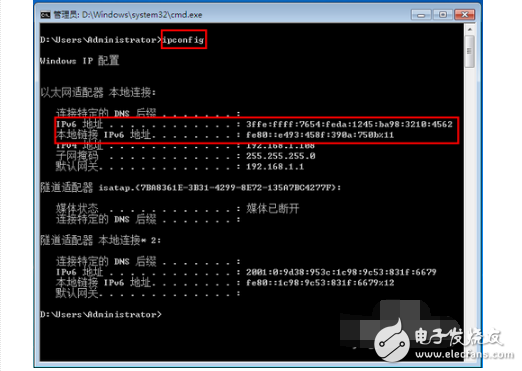
Set the IPv6 address: Open the Control Panel, go to "Network and Internet" - "Network Connection" - right click on "Local Area Connection", double-click "Internet Protocol Version 6 (Tcp/IP) in the properties dialog box that pops up, in its properties Select Manual in the box and enter the IPv6 address "3FFE:FFFF:7654:FEDA:1245:BA98:3210:4562" (Because IPv6 is in the test phase, you can freely enter and determine its address).
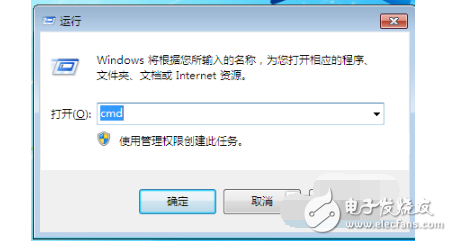
Test IPv6 settings: Press "Win+R" to open the Run dialog. Enter CMD and enter the "ipconfig" command in the pop-up MSDOS window to view the configuration of all local IP addresses.
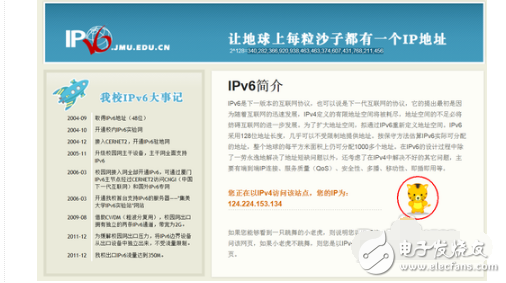
4 Configure the ISATAP tunnel. When finished, open the browser and enter the URL "http://ipv6.jmu.edu.cn/" to test the IPv6. On the page, if you can see a dancing tiger, explain You access this page in IPv6. If the tiger does not dance, you will access the page in IPv4.
Dormitories and laboratories usually only apply for one IP address, and then use a router to implement several machines at the same time. The external network traffic of each IP address for one month is limited. For Tianjin University, the upper limit of the external network traffic is 10G/month. When there is a group of wretched men in the dormitory, these traffic is basically not enough. The IPv6 network does not calculate the external network traffic, which greatly alleviates this problem. However, the ordinary router does not support the IPv6 protocol. This problem is specifically mentioned in the IPv6 configuration method introduced by the Network Center of Tianjin University. This post describes how to modify the settings of a common router to implement a small LAN single IP multi-machine and use IPv6 network at the same time.

The main idea is to set up a computer as a "server", install a virtual route, and change the original route to "switch", and other computers to be set to "client" to achieve the purpose of using multiple IPv6 networks at the same time. The configuration method is divided into the following four steps:
(1) Install the IPv6 protocol on each machine;
(2) modify the router;
(3) setting up the host;
(4) Set the extension.
1 Install IPv6 protocol on each computer
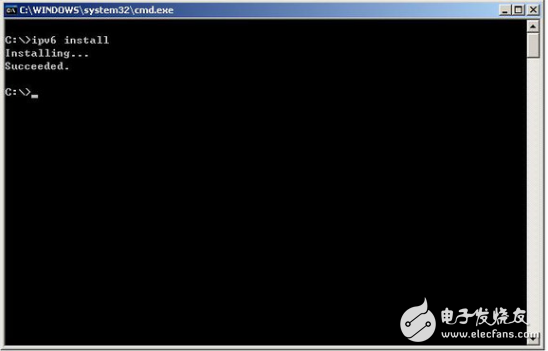
This step is relatively simple, and most IPv6 websites have setup methods. Take Windows XP as an example. Enter "cmd" in the run, call up the command prompt, type "ipv6 install" and press Enter.
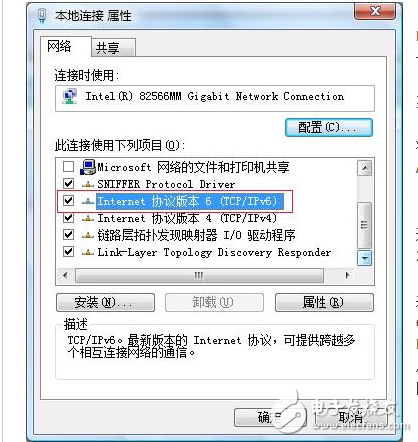
Windows Vista and Windows 7 do not need to install IPv6 protocol. Note that "Internet Protocol Version 6 (TCP/IP6)" is checked in the local connection.
2 Modify the router
Because there are many router models, we can't explain them one by one. This post introduces the settings of the router with the TP-LINK/TL-R402 used in our dormitory. The router settings of other models are similar.
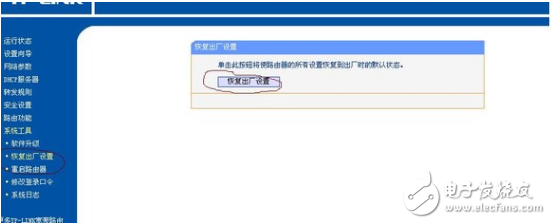
Enter 192.168.1.1 in the browser address bar to open the router interface. System Tools → Restore Factory Settings;
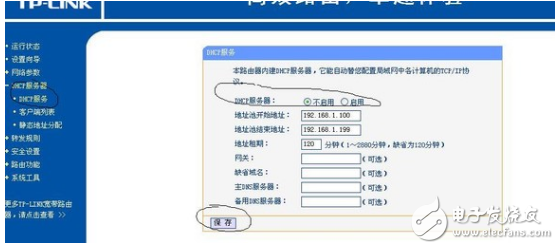
DHCP server → DHCP service → DHCP server: not enabled → save;
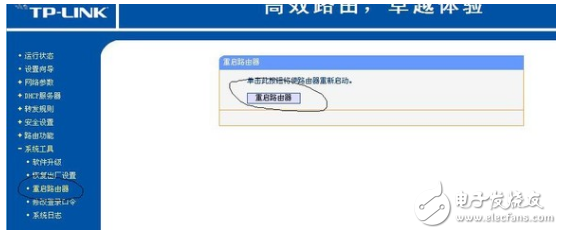
System Tools → Restart Router;
Unplug the network cable (main line) on the WAN port on the router and plug it into the LAN port.
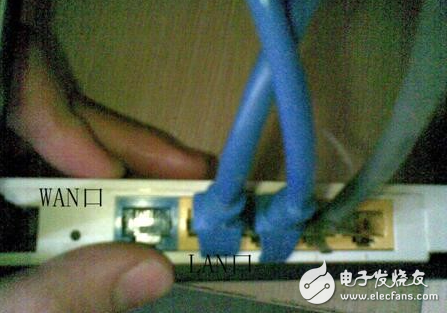
Then the router is changed to a "switch".
3 Set up the host
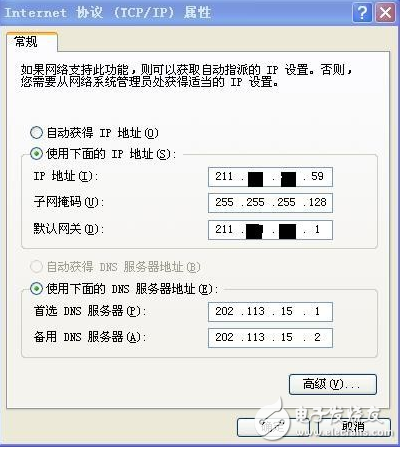
Pick a computer as the host, set the IP address on the machine and install the virtual route. IP settings are the same as usual, open "Internet Protocol (TCP/IP)", IP address is set to the school assigned IP, such as my IP settings are 211.*.*.59, restart the computer after the setup is complete. At this point, the host can already access the Internet and use the IPv6 network.
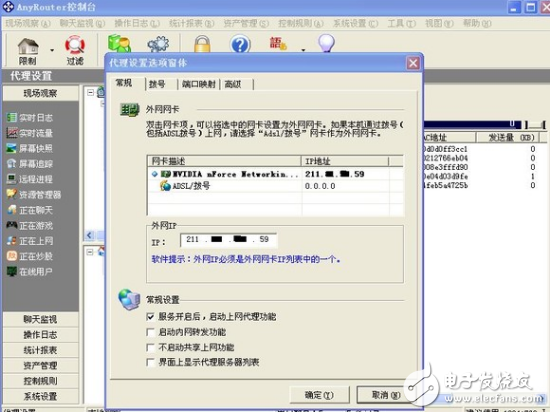
Use the Anyrouter software to set up virtual routes. When there are less than 8 extensions, the software is free. Just download one and use it. Open the AnyRouter console→System Settings→Proxy Settings option to specify the external network card. This external network card is the network card used by the host. The corresponding external network IP corresponds to the IP address assigned by the school. Click OK. The host is set to The "server".
4 Set the extension
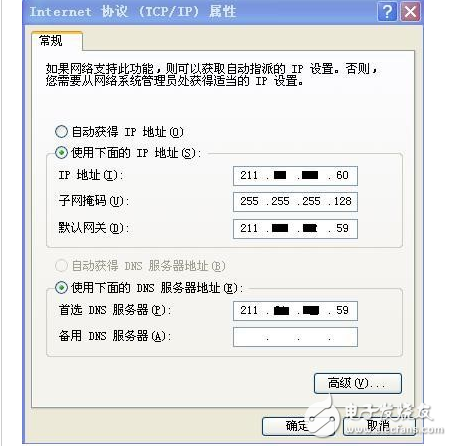
Open the extension "Internet Protocol (TCP/IP)" and modify the IP address of the extension to complete the "client" setting. Taking this dormitory as an example, the first 3 segments of the extension IP address are the same as the host IP, and the last segment is changed to the last segment of the host IP +1, +2, +3.... The subnet mask is the same as the host; the default gateway is the host IP; the preferred DNS server is the host IP. After the setup is complete, the extension can go online and use the IPv6 network. It should be noted that at this time, the host is equivalent to the “serverâ€, so the host must be turned on when the extension is online.

Product advantages:
1. Stylish, portable, practical and convenient home charger
2. 6-port USB emergency charger, which can be used safely for tablet computers and can charge 6 devices at the same time
3. Built-in IC chip and fuse, protection: over current, over voltage, short circuit protection
4. The latest release, new design, beautiful appearance, high efficiency and energy saving, the best alternative to the original charger
5. Chargers for MP3, MP4, GPS, PDA, e-books, mobile phones, digital cameras, tablets, etc.
Features
(1) Overcharge protection
(2) Over discharge protection
(3) Short circuit protection
(4) Voltage stabilization protection.
(5) Automatic identification of mobile phone current protection.

1. Connect up to 6 USB devices at a time, and each device will receive a unique and tailor-made charge. The maximum output power of QC3.0 is 18W, which can optimize the charging of all devices.
2.2QC3.0+4 ports total 6 charging ports, which can charge 6 devices with a total power of 84W at the same time
3. With multiple protection safety systems, the product will automatically adjust the charging current according to the needs of the device being charged. Automatically detect and adjust the charging current to charge your device at the fastest speed.
One machine for multiple uses
The USB charger can charge 6 devices at the same time, and the smart recognition technology will detect and provide the best charging level for each of your devices.
The maximum output current of a single USB port is 2.4A. 2QC3.0 has 6 charging ports, which can charge 6 devices at the same time without causing shunting or reducing power. The USB charger can quickly charge your devices. Smartphones and tablets can receive up to 2.4 amps of current, so you can use the device as you like while charging.
Over-current, over-charge, and short-circuit protection will make charging safe, without any risk of overheating or damaging the device. Passed CE/FCC/ROSH/PSE/CCC certification. Through safety certification to ensure safe use.
Usb Charger,Usb C Charger,Usb C Power Adapter,Portable Usb Charger
Shenzhen Jinziming Electronic Technology Co.,LTD , https://www.powerchargerusb.com