UltraFast is a set of design methodology guides that Xilinx introduced at the end of 2013 to guide users to maximize their existing resources, improve system performance, reduce risk, and achieve faster and predictable designs. The main body of the UltraFast methodology for Vivado is the UG949 document, which is updated with the corresponding Checklist and updated with the Vivado version. Users can download it for free from the Xilinx homepage. At present, the UltraFast Chinese version of the Vivado design kit is also available. Another new UltraFast embedded design method guide UG1046 for embedded programmable design is also available for download on the Xilinx official website.
Although the term UltraFast is often seen online, it is often mentioned in the official and other media when it comes to the Vivado design suite, but many users still blur the concept. Many people download the document and see a 300-page PDF. Suddenly lost interest in deep learning and understanding.
The series "Vivado Misunderstanding and Advanced" has been serialized for more than half a year. Most of the pre-listed topics have also been completed according to plan. We are going to put these short articles into an e-book, which is convenient for more readers to read or necessary. Used as a design reference. Taking this opportunity to apply Greg Daughtry, director of product marketing at Xilinx, known as "Father of Vivado", in the first Club Vivado last year, the concept of "Ten Principles of Timing Convergence", try to use ten minutes of space. Summarize what UltraFast is and how to use UItraFast to really help our FPGA design.

The ten criteria for timing design basically cover the basics of the UltraFast design methodology guide. UG949 divides FPGA design into design creation, design implementation and design convergence. In addition to introducing all available design methods and resources, there are more advanced methodological techniques, which are basically related to timing closure. Or with timing closure as the goal, some common methods and techniques are even out of the limitations of the specific FPGA device, suitable for timing closure in a broader sense.
Most valuablely, all of these UltraFast design methodology skills come from the experience of frontline technical support staff and customer feedback, and are the industry's first truly user-oriented guide, as long as you try to read a couple of sections. UG949 will have a clear feeling, all the techniques and methods mentioned are highly maneuverable and can bring immediate results.
Next, we will start from these ten criteria, and lead readers to clarify the context of UltraFast methodology in ten minutes.
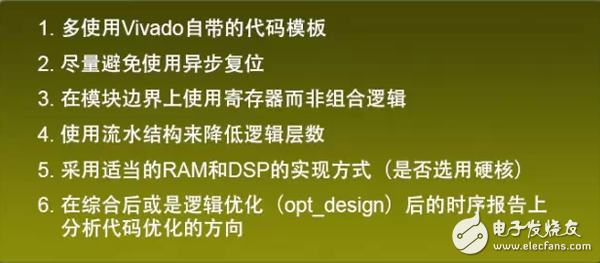
Guideline 1: Appropriate code style In an ideal environment, the source code can be independent of the device ultimately used for implementation, resulting in optimal portability and reusability. However, the unique structure of the underlying devices determines the inefficiency of the general-purpose code. To maximize the performance of the hardware, it is necessary to tailor the code to implement the tools and devices.
Regarding the code styles that Xilinx devices and Vivado are suitable for, we have the following recommendations:
Guideline 2: Accurate Timing Constraints Accurate timing constraints are the basis for design implementation. For the timing-driven tool Vivado, the constraint is the highest indication and is the goal of its efforts. Many times we find that an experienced engineer likes to apply some old experience to Vivado. For example, many people prefer to use constrained methods to pursue higher performance, but in fact, most of Vivado Over-constraints only hinder timing closure.
In a nutshell, a concise and accurate constraint is a necessary condition for timing closure, and the Baseline baseline method proposed in UltraFast is a sufficient condition.
The specific constraint method is discussed in detail in "XDC Constraint Technique". In addition to ensuring the correct syntax, we must also pay attention to the order of setting XDC constraints. Usually, we only need to constrain all clocks in the first run, and then basically satisfy the timing constraints in the internal path. In the case of the key I / O constraints, and then consider the necessary timing exception constraints.
All of these constraints must follow a streamlined and accurate principle and can be done with the help of XDC Templates in Vivado and the TIming Constraint Wizard.
The Baseline baseline method is arguably the soul of UltraFast. It is strongly recommended that all Vivado users can read this part of UG949 and apply it to specific designs. I have the opportunity to dig into a short article dedicated to the Baseline method. Here I will summarize the core concepts.
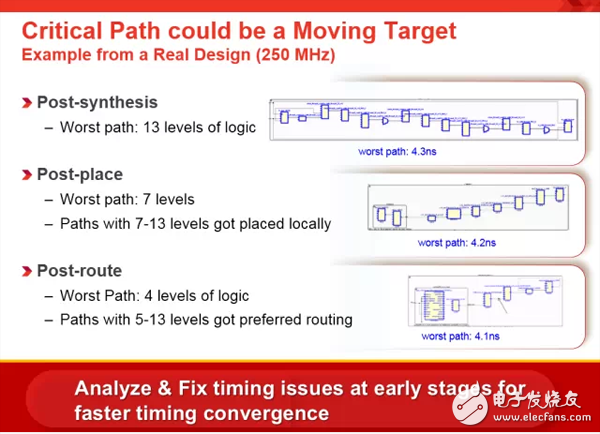
The figure above shows the worst path for the same design to report timing with the same command at three different stages. It can be clearly seen that even without any source code changes, the true worst path in the design is no longer Will appear as the worst path in the post-layout report. This is precisely because the nature of the Vivado timing driver determines that each step of the design implementation is based on the design inputs and constraints read at the beginning, and try to use the best resources on the worst path, so as to maximize It is possible to achieve timing closure.
This is the basis of Baseline's theory. In addition to setting precise timing constraints in order, at each step of the design implementation, the user needs to pay attention to the timing report and use it as a basis to adjust the design source code or apply other necessary constraints and options. To optimize the design. Ensure that the timing reports after each phase meet the constraints or timing violations within 300ps, and then proceed to the next phase of the design implementation process. Otherwise, you should continue to re-run the design at the current stage or return to the previous stage. Until the requirements are met and continue.
The sooner you find and locate problems, the more you can achieve a wider range of improvements with a small amount of effort.
Guideline 3: Managing High Fanout Networks High fanout networks are almost the biggest barrier to limiting FPGA design to higher performance, so we need to take the high fanout network in the design very seriously.
Many people will fall into a misunderstanding. How often is the fanout value large? In fact, this is not absolute. In the case of insufficient resource requirements, thousands or even tens of thousands are not large. On the contrary, only a few dozen fanouts on the local critical path may need to be further reduced.
In Vivado, in addition to focusing on timing reports, especially post-layout reports to locate high-fan-out networks that affect timing on critical paths, there is a special command, report_high_fanout_nets, after adding the -TIming option. You can report the Slack of this path while reporting the high fanout path, helping the user to visually understand the timing margin of the current path. In addition, this command will also indicate in the report the type of driver for the high fanout network, which is FF or LUT.
Once the target is found, max_fanout can be used to limit its fanout value, allowing the tool to copy the driver registers during the implementation to optimize. If the high fanout network is not driven by synchronization logic, you may need to modify the code. There are also some fan-down methods at the tool level, such as choosing a stronger and more targeted strategy, or allowing multiple physical optimizations of phys_opt_design, even through the "Implement Vivado Design Implementation Process with Tcl". "Hook" scripts and other methods to perform physical optimization of local fan-out and so on.
However, it should be noted that the global fanout limit in the Vivado comprehensive option should be used with caution. Do not set it too low to avoid the oversized network table being too large, causing waste of resources and possibly causing local congestion.
Guideline 4: Hierarchical Design Structure With the continuous expansion of design scale and the rise of SoC design, more and more IPs are integrated into large designs, which have been created for high-performance design, which facilitates unified management and control. The downward design flow becomes no longer applicable, and FPGA design, like large-scale SoC design, requires a hierarchical design process, a bottom-up process. This also requires the designer to consider the final implementation in the source code phase and handle the hierarchical boundaries of the module.
The IP design in Vivado is a native bottom-up process where users can add IP-generated independent DCPs to the top-level design. We also encourage users to integrate some of the relatively fixed or independent modules into a DCP and then add the top-level design. In addition to speeding up the design iteration, it is also more conducive to debugging and problem positioning at the beginning of the design.
The OOC mode in Vivado even supports a fully hierarchical design, which also multiplexes the layout and routing results of the underlying modules. Although the process is complicated, it brings more comprehensive control and is also the realization of some reconfigurable technologies. basis.
Guideline 5: Handling cross-clock domain design
FPGA designs often have paths across clock domains. How to handle these CDC paths is very important. Since the constraint standard XDC supported by Vivado is essentially different from the UCF constraint supported by the previous generation ISE in processing the CDC path, how to constrain and how to ensure the reliability of the CDC path from design is a top priority.
The cross-clock domain design in Vivado is described in detail in the CDC of XDC Constraint Techniques. There are also a lot of space in UG949 to discuss various design techniques and constraints of CDC paths. Users are advised to learn and understand this part of the content, many of which are not limited to cross-clock domain design in FPGA design, but also effective in other IC designs.
Need to remind everyone, be sure to take advantage of the various reporting features in Vivado, such as report_cdc and methodology_checks in the DRC report to detect CDC structure problems in the design, and make specific design adjustments or complement CDC constraints. In addition, we must pay attention to the advantages and disadvantages of different CDC path processing methods, choose the most suitable way for our own design, and cooperate with the corresponding constraints to ensure the security of the cross-clock domain path.
Guideline 6: Lesser and more precise physical constraints are different from the comprehensive and precise requirements for timing constraints, especially clock constraints. Vivado requires only one word for physical constraints: less. The physical constraints here emphasize more constraints than the necessary I/O pin locations, such as positional constraints on RAMB and DSP48, and local floorplan plans.
Many senior engineers like to draw floorplans because they know the data flow and resource usage of the design. The floorplan drawn according to their own understanding is usually reasonable. However, floorplan is much less important in Vivado than it used to be on ISE. According to the customer's actual experience feedback, most floorplans do not need any floorplan (some timing requirements for higher SSI chip design may be needed), because the algorithm is improved, Vivado is smarter than the previous generation ISE in layout, no Any physical constraints (except IO pin position constraints) can be designed to better meet timing requirements in less time.
In the design that really needs to lock some macro units and floorplan, we generally recommend running the design without any physical constraints. After other methods such as improving the source code, setting constraints and options, changing the strategy, etc., Try physical constraints. Moreover, it is best to perform floorplan only in a small number of key design areas, avoid excessive constraints, and do not create pblocks with excessive resource utilization while avoiding overlapping pblocks.
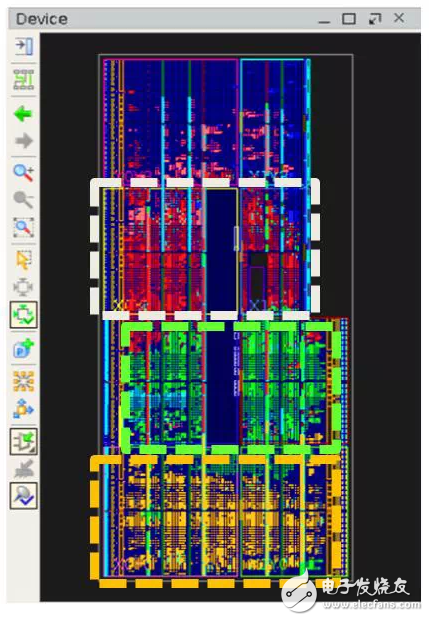
By the way, the Device view in the Vivado IDE can be used to highlight different modules by setting different colors. Users can create and adjust the floorplan based on the layout results of the current design with timing reports and critical paths.
Guideline 7: Choosing an Implementation Strategy After upgrading from ISE to Vivado, many users found that the SmartXplorer function was gone. When the design was advanced, if the seed could not be traversed, it often made people feel at a loss, and even suspected that Vivado had nothing to do. So what is the truth?
Strictly speaking, Cost Table is actually a helpless move, indicating that the tool can only filter out a best result by “crash†by random seed changes, which explains why the result of changing Cost Table is random. Once the timing is met, it does not mean that it can always be satisfied.
Because of the introduction of more advanced algorithms, the design implementation in Vivado has become more reliable and is a truly predictable result. But this does not mean that there is only one result of laying and routing the same design in Vivado. We can use "strategies" to control the algorithmic focus in the implementation process, which can produce more optimized results.
Strategy is a combination of a set of tool options and various stage indicators (DirecTIve). There are dozens of built-in Vivado IDEs that can be directly selected by users, but if there are exhaustive combinations, there are thousands of strategies in the whole implementation process. Of course, we don't have to traverse every strategy. And because the strategy is a predictable and reproducible implementation, the same design can be selected after selecting several focused strategies, as long as there are no major changes in the design. The same strategy has been extended.
For the characteristics of the specific strategy, please refer to the UG949 and UG904 documents, or in the Vivado through the help menu. More often, the choice of strategy is a kind of experience. In addition, even if the best implementation strategy is found, it is still possible to not meet the timing requirements. At this time, we can also refer to "Customizing Vivado Design Implementation Process with Tcl". The process of design implementation is further personalized.
It's also important to emphasize that modifying the strategy to improve performance must be done after adjusting for more direct and efficient optimization methods such as code, constraints, and options. The performance improvement is more limited than the previous optimization method.
Guideline 8: Sharing control signals sharing control signals fully demonstrates the importance of design considerations for the underlying implementation of the chip structure. On Xilinx chips, clocks, set/reset, and clock enable signals are known as Control. Set, the Control Set entering the same SLICE must be unified. In other words, FFs under different Control Set controls cannot be placed in the same SLICE by Vivado.
In order to improve the utilization of SLICE, obtain a more efficient layout scheme, and improve timing performance, we must control the total number of Control Sets in a design and share control signals as much as possible. Specific practices include:
Try to integrate clock and clock enable signals with the same frequency;
When you select the "Share Logic" function when generating IP, you can share clock resources as much as possible between different IPs.
Follow the Xilinx recommended reset criteria:
Use reset as little as possible. Use synchronous reset when resetting. Make sure to use an active-high reset to avoid asynchronous reset (asynchronous reset is not supported in RAMB and DSP48 modules)
Xilinx's reset criteria must be strictly adhered to. According to the experience of field support, many design performance bottlenecks are that the design of the source code does not consider the hardware structure characteristics of the underlying implementation device, especially the implementation of the reset signal is most prominent.
Guideline 9: Reading Logs and Reporting Logs and reports for any tool are the most important part of measuring performance. Because of the complete log and report, users can use the information displayed to locate possible designs. The problem, decided to optimize the direction.
The Vivado log shows the information in three categories: Error, CriTIcal Warning, and General Warning/Notes. Error causes the tool to be interrupted directly. Other warnings do not interrupt the tool, but all Critical Warnings require the user to check them one by one and fix them by modifying the design, adding constraints, or setting options.
Vivado's reporting capabilities are very powerful, in addition to the timing analysis report described in "Reading the Timing Report", there are many important reports, ranging from checking specific timing components and links in the design, to various presets and Customized DRC inspection not only provides users with a variety of choices, but also further ensures the reliability of the design.
Vivado has also been enhancing and updating the types of reports. For example, after 2014.3, a design analysis report report_design_analysis was added to report potential problems on critical paths and the degree of congestion in the design. Complete report commands and functions can be queried in UG835.
Guideline 10: Play the role of Tcl
Tcl's role in Vivado is not to be underestimated. Not only does the design flow and reports fully support Tcl scripts, even XDC constraints are fundamentally derived from Tcl. Users can even directly read advanced constraints containing functions such as loops into Tcl. Vivado is used to guide the entire implementation process.
There are three articles in the "Vivado Mistakes and Advanced" series on Tcl's application in Vivado. It describes in detail how to use Tcl to create and apply constraints, find targets and locate problems, and how to use Tcl to customize Vivado's design implementation process. The graphical interface provides more extended support; and how to implement ECO processes with Tcl. The powerful scalability of Tcl determines the advantages that graphical interfaces can't match in terms of version control and design automation processes. It also explains why high-end FPGA users and skilled Vivado users prefer Tcl scripts.
In addition, with the introduction of Xilinx Tcl Store, users can download and use Tcl scripts like downloading apps in the App Store, simplifying the application of Tcl on Vivado and further expanding the in-depth and refined use of Tcl. Most importantly, the Tcl Store is a completely open source environment based on GitHub. Of course, you are welcome to upload your own useful Tcl scripts to complement them.
Summary The summary of the essentials of UltraFast can be summarized in the above ten points, which can also be seen as a string of essays on the "Vivado Mistakes and Advanced" series of essays. To be honest, the eight-nine-page page is basically impossible to talk about the entire UltraFast. For those who are using Vivado for design or interested in trials, it is highly recommended that you download the full UltraFast guide and read it on the Xilinx official website.
This essay and this e-book are designed to help you get started with Vivado and XDC as soon as possible, with the sword in hand, plus the gods of the world, and walking around the rivers and lakes. I sincerely wish you all the best in the FPGA design road, let Xilinx and Vivado help you succeed.
The high-definition Hydrogel Screen Protector is made of TPU (polyurethane) material, which has high self-healing performance and anti-scratch performance. It is suitable for cutting with a Screen Protector Cutting Machine, but you need to pay attention to the angle of the blade when cutting to avoid cracking the Screen Protector.
Compared with other Screen Protectors, Hydrogel Screen Protectors have the following advantages:
1. HD Clear: The Hydrogel Screen Protector has an ultra-thin thickness of 0.14mm and high transparency. It will not affect the display effect of the mobile phone screen, and users can enjoy a clearer display effect.
2. Self-healing: The Hydrogel Screen Protector can automatically repair minor scratches or damage when encountering minor scratches, abrasions, etc., so that the screen remains perfect. Therefore, the lifespan of the screen protector can be extended.
3. Full coverage: The Hydrogel Screen Protector uses a high-permeability adhesive with strong adhesion. The flexible hydrogel film tightly fits the entire device screen without warping the surface, providing maximum protection for your screen
4. Sensitive touch and anti-fingerprint: The ultra-thin material provides a sensitive touch, which significantly improves the touch sensitivity when playing games. Built-in oleophobic and anti-fingerprint coating protects your screen from fingerprints and oil stains and is easy to clean.
HD Hydrogel Screen Protector is a powerful Screen Protector with perfect protection and repair effects, and also has the advantages of high transparency and no bubbles, which is an ideal choice for protecting your screen.
HD Screen Protector, High-Definition Screen Protector, HD Hydrogel Film, HD Clear Screen Protector, Hydrogel Film,HD Hydrogel Screen Protector
Shenzhen Jianjiantong Technology Co., Ltd. , https://www.jjtbackskin.com